Tuesday, December 9, 2014

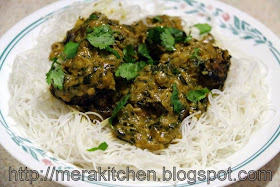
Kale chane ani Jeev kadgi Ghassi (breadfruit and dark chickpea curry)

This is one of those dishes that is cooked at festivals and weddings. The black chana and the breadfruit (Jeev Kadgi) make it an amazing combination of flavors along with the mild spices and the mustard tempering in coconut oil and ofcorse the ground coconut masala adds its own unique flavor profile. This is also cooked with raw jackfuit and the kala chana can be substituted with kabuli chana (Garbanzo beans) too.
I personally do not know how it is cooked in the most authentic way - but, I like the use of chana dal (split bengal gram) and urad dal (Split black gram) in the masala mixture and I like to roast the coconut a bit too. There are various ways to cook this humble ghassi and like many recipes this differs from household to household.
Since this was cooked for a festival as a neivedhya - there is no use of onion or garlic here.


Ingredients

1 cup kala chana/dark chickpea
1 cup breadfruit - I used the precut frozen breadfuit.
2 tablespoons urad dal/split black gram
1 tablespoon chana dal/split bengal gram
1 teaspoon whole coriander seeds
1/2 teaspoon cumin seeds
1 cup grated coconut
1 teaspoon tamarind paste
5 dried kashmiri chilis (use more or less as per taste)
2 tablespoons coconut oil (you can use any other cooking oil too)
1 teaspoon mustard seeds
10 curry leaves
1/2 teaspoon turmeric powder
1/4 teaspoon asafoetida/hing
1 teaspoon oil (I used olive oil)
salt to taste

Method

Soak the kala chana in 4 cups of warm water for 8 to 10 hours. Pressure cook them in just enough water to cover the chanas along with 1/2 teaspoon turmeric and 1/4 teaspoon asafoetida and 1 teaspoon oil. Cook it for about 3 whistles and wait till the cooker releases the pressure.
In the meantime make the ground masala. In a karahi add 1 teaspoon coconut oil. When it gets hot, lower the flame to a medium and add the whole coriander seeds, urad dal, chana dal, dried kashmiri chilis and cumin. Let this saute for about 30 to 40 seconds till a nice aroma of the dals fills the kitchen. To this add the grated coconut and saute till they turn a little golden brown. Take this mixture out onto a plate and let it cool. In the same karahi, add the 1 teaspoon coconut oil. when it gets hot, add the mustard seeds and let them splutter. Then add the curry leaves and when they crisp up, add the breadfruit pieces. Mix well, add about 1/4 cup water and cover and cook on low medium flame for 10 minutes.
By now the roasted masala will have cooled to a warm. Grind this to a fine paste adding the tamarind paste and just enough water to get the grinder running,
Add this paste to the cooking breadfruit along with the pressure cooked chanas. Add just enough water to get a thick gravy as shown in the picture. Add salt to taste. Cover and let this mixture come to a boil - then lower the flame and let it simmer for about 10 more minutes.
Serve with plain steamed rice or chapatis. I can eat it just like this in a bowl.

Wednesday, November 5, 2014

Gudi Padva Thali - 31 March 2014


This has been a long long overdue post. We celebrated Gudi Padva on 31 March 2014. Its a Maharashtrian  festival celebrating the first day of the New Year according to the Hindu Calendar. This festival is also called 'Ugadi' in Kannada - I know this because I was born in North Karnataka and spent a good 7 years of my life there.
We refer to this festival as Gudi Padwa or Ugadi at home.
I remember Mom making some wonderful dishes on this day. Ofcorse the dreadful part used to be the neem leaves that we had to chew. Ofcorse mum used to have it smeared in sugar and grated coconut............ still it was bitter and had a funny smell. But, we ate it so that we could enjoy the goodies that were to follow.
we had a fun meal of Maharastrian food as well as Konkani food. What can I say - we are foodies and celebrations means food. On this day I had made food like it is in most Konkani households.
So - this year we had a fun meal on the auspicious day. Kiddo was at home and the husband was working from home - so, it was fun.
This is how the thali looked - We had Sheeth (Rice) with Dali Thoy (Dal) in the big bowl. On the plate (lets go clockwise) - kale chane ani jeevkadgi ghassi, beans and carrot sukhi bhaji, khamang kakdi, shevai kheer, Puri, Rice Papad and Potato Bhajiya in the center.

Sheeth & Dali Thoy

Kale Chane ani Jeev Kadgi Ghassi

Rice Papad

Puri

Khamang Kakdi

Potato Bhajiya

Shevai Kheer

Beans & Carrot Sukhi Bhaji

Tuesday, November 4, 2014

Rasam Powder


Ingredients

15 dried kashmiri red chilis
15 curry leaves
1/4 cup tuvar dal/split pigeon peas
1/4 cup masoor dal/split lentils
2 tablespoons urad dal/split black gram
2 tablespoons coriander seeds
2 teaspoons black peppercorns
1 teaspoon cumin seeds
1/2 teaspoon fenugreek seeds/methi seeds
1/2 teaspoon asafoetida/hing
1 teaspoon turmeric powder

Method

Dry roast all the ingredients one by one except the asafoetida and the turmeric powder - till a nice aroma comes by. Mix all the ingredients together including the asafoetida and the turmeric powder and run it through a mixer/blender/grinder to get a nice powder.
Rasam powder is ready. Store in a airtight container. Lasts for a good year.
Use it to make Rasams of your choice.

Tuesday, October 28, 2014

Jeera aur Saunf wali Chicken Curry (Cumin & Fennel Flavored Chicken Curry)

Chicken curry with bread or chapattis is a staple dinner at our place as 'Little Miss A' always loves to eat it. You ask her what she wants for dinner and pat comes the reply........... Can we have some chicken curry please............
Just like her father Mr. A - she wants variety when it comes to the favorite food too. So, I have been coming up with different different versions of the curry - just to please my family.
For vegetarians - you can add potatoes, cauliflowers, peppers, paneer or even some soaked and cooked kabuli chana (Garbanzo beans) or black eyes kidney beans to the gravy.
I had made this simple stuff when my cousin an his family had visited us a couple of weeks ago - and it was loved by my niece and nephew.


Ingredients

1 tablespoon cumin seeds
2 tablespoons fennel seeds
1/2 teaspoon whole black pepper
2 green cardamoms
2 cloves
1 black cardamom
1/2 cup grated coconut
1/2 cup - chopped cilantro
5 green chilis - you can add more or less as per your spice preference
2 pounds chicken - I used boneless skinless thighs - cut into bite size pieces
2 onions - roughly chopped
10 cloves garlic - grated
1 inch ginger piece - grated
1 bay leaf
1 cinnamon stick
2 tablespoons oil
1/2 teaspoon turmeric powder
Salt to taste
Chopped cilantro for garnish


Method

Grind to a fine paste by adding very little water the cumin seeds, fennel seeds, black peppercorns, cardamom, cloves, black cardamom, green chillis, cilantro and coconut and keep aside.
In a wok or karahi add the oil and once it gets hot add the bay leaf and the cinnamon stick. Then add the chopped onions and grated garlic and fry till it turns into a golden color. To this add the grated ginger and turmeric powder and saute for another 1 minute. Add 1/2 teaspoon salt and the ground masala paste. Mix this well and keep stirring it for about 10 minutes. Now add the chicken pieces , lower the flame to a medium, add half cup water and cover and let it cook for 25 to 30 minutes.
Open lid and stir the curry well. Add salt if needed, according to your taste and check if the chicken is cooked through. If chicken is not cooked - cover and let it cook on medium flame for another 10 minutes or till it gets cooked through. Adjust water to make it as thick as you wish. I kept it at curry consistency - a little more runny than a dosa/pancake batter.
Serve hot with bread slices, pav, chappati or with rice.

Wednesday, September 24, 2014

Vangi Bhaat (with some bell peppers and spinach)

After the vaangi bhaat masala powder recipe - it is ofcorse time for some yummy warm vaangi bhaat.
I had to go and twist it a bit. So I added some green and red bell peppers and some spinach too. These peppers were given to me by my ever-loving dear friend Mini - her parents had grown them in their vegetable patch.
We liked this with some cooling cucumber and carrot salad and a bowl of yogurt.
Little Miss A liked it too - even though it was a tad bit spicy for her taste I guess, as she was eating yogurt after every bite of the vaangi bhaat.

If you do not wish to make the masala for storing - but, want to make it just for the one time use - here is what you can do

1 tablespoon coriander seeds

1/2 teaspoon cumin seeds
1 tablespoon bengal gram/chana dal
1 tablespoon split black gram/urad dal
2 dried kashmiri chiis
2 dried byadgi chilis
1 tablespoon dried coconit slices
10 curry leaves
1/8 teaspoon fenugreek seeds
2 cloves
1 green cardamom
Dry roast all of them together and grind to a fine powder in a spice grinder.


Ingredients

2 cups rice - I used sona masoori
1 teaspoon salt
1 red onion - chopped finely
6 chinese eggplants (they were about 3 cups when chopped)
2 cups chopped spinach
1 tablespoon coconut oil (you can use any other oil too)
1 teaspoon mustard seeds
10 curry leaves
1 chopped green chili (more if you like the heat)
1/2 cup groundnuts
1/2 teaspoon turmeric powder
salt to taste
5 tablespoons vaangi bhaat masala


Method

Wash the rice clean. In a saucepan add 6 cups of water and bring it to a boil. Add the 1 teaspoon salt and the rice and let it cook for about 10 minutes or till the rice is cooked through. Drain it into a colander or sieve and let it sit.
In a karahi/wok - add the coconut oil. When it gets hot add the mustard seeds and let it splutter. Then add the curry leaves, the green chili (if using) and the groundnuts and fry on medium heat till the groundnuts get a golden color. Add the chopped onions and the turmeric and saute till the onions become transparent. Then add the eggplants, green and red peppers and the spinach and mix well. Cover and let it cook for about 5 minutes. Check if the eggplants are cooked through, if not then cover and cook for another 5 minutes. Add the vaangi bhaat masala and salt to taste and mix it well. Add the cooked rice to this mixture and mix it around with a very light hand so that each grain of rice is coated with the masala. Cover and let it simmer/steam for about 5 minutes.
Serve with yogurt and salad of your choice.

Tuesday, September 23, 2014

Vangi Bhaat Masala Powder

Vaangi bhaat is nothing but brinjal(eggplant) rice. It is a very yummy and tangy and spicy rice preperation pretty famous in Karnataka state of India. Makes a wonderful one pot meal which is filling and also has a good serving of vegetables (her its eggplant).
The masala used in vaangi bhaat is made and generally stored for a few months making it easy to prepare a meal in a jiffy.
I made this masala based on the bhaaji masala and the kholamba masala that I had made a few months ago. It may not be the most authentic one but these are the basic ingredients used in everyday cooking in southern India. I have a bottle of it and now vaangi bhaat is enjoyed by us without having to worry about grinding the masala everytime.


Ingredients

1 cup coriander seeds
1/4 cup cumin seeds
1 cup bengal gram/chana dal
1 cup split black gram/urad dal
2 cups curry leaves
1/8 cup cloves
1/8 cup green cardamom
2 tablespoons fenugreek seeds
1 cup sesame seeds
30 dried red kashmiri chilis
30 dried red byadgi chilis
1 cup dried coconut slices/kopra slices

Method

In a large karahi or frying pan - dry roast each ingredient individually till they release a nice aroma. Be careful to do this on a medium flame as you do not want to burn any spices. Should take anywhere from 5 minutes to 10 minutes depending on the size of the ingredient.
Once all of the ingredients are roasted - add them to a dry grinder and make a fine powder. Store in a dry bottle - in a cool and dry place. This stays good for about 3 months.
I generally store mine in the freezer and it stays good for 6 months to a year.

Use it to make the traditional vaangi bhaat. But, I change the veggies now and then. I make tendli (ivy gourd), bell pepper, cabbage, cauliflower, beans bhaat (rice)

Gobi Palak (Cauliflower in Spinach Gravy)

I always have baby spinach at home. Its something that I add to most of the stuff that is cooked at home. Its a part of dal, omelettes, palak raita, alu palak, corn palak, even the humble alu gobi becomes palak wala alu gobi. I even add pureed spinach to my chappati dough to get palak rotis. Palak Paneer is a favorite - but, paneer is too heavy to be consumed on a regular basis so its like a delicacy enjoyed occasionally.
Potatoes are not loved at our home. If its a part of a vegetable preparation or if it is int eh form of alu paratha then it is fine.
So, the other day I saw I had two huge tubs of baby spinach in my fridge and the only other vegetable there was cauliflower. Since I had a lot of time on hand, I decided to make this dish as it would look lovely and feel like a royal meal. Little Miss A loved it and so did Mr. A. So we have another spinach preparation in our menu cards.


Ingredients

1 caulifower head - it gave me 4 cups florets (i/2 inch pieces)
4 cups spinach
1 onion - finely chopped
1 tomato
9 cloves garlic
1/2 inch ginger piece
2 tablespoons grated coconut
1 black cardamom
3 green cardamoms
4 cloves
1/2 inch cinnamon stick
1 bay leaf
1 teaspoon fennel seeds
1/2 teaspoon cumin seeds
1/2 teaspoon black pepper
1 teaspoon turmeric powder
1/2 teaspoon chilli powder
2 green chilis (add more or less as per preference)
1/2 cup water
1 tablespoon ghee
1/2 teaspoon oil
salt as per taste

Method

Preheat your oven to 350 degrees Fahrenheit. Wash the cauliflower florets very well. Add 1/2 teaspoon turmeric powder, 1/2 teaspoon chili powder, 2 gloves of garlic grated and a pinch of salt and toss it all together with 1/2 teaspoon oil. Lay the cauliflower florets on a cookie sheet in a single layer and get them nice and crisp but still still tender in the oven. It should take about 15 to 20 minutes. Once done, remove it from the oven and let it sit.
In the meantime - blanch the spinach in boiling water for 5 minutes and then put it in ice cold water. Drain spinach and get a puree done.
In the same grinder, add the tomato, remaining garlic cloves, ginger, green chilis, green cardamom, cinnamon, cloves, fennel seeds, cumin seeds, black pepper, bay leaf, remaining turmeric powder, grated coconut and grind to a very fine paste.
In a saucepan, add the ghee. When it gets hot, add the chopped onions and fry them till they turn a golden brown. Then add the masala paste and mix well. Let it cook on medium heat till oil starts to leave the sides. Then add the pureed spinach and 1/2 cup water and salt to taste. Mix well and let it all come to a boil - be careful as the mixture has a tendency to splatter. Once it boils, lower the heat to a medium low and add the roasted cauliflower. Gently mix it so that the cauliflower is coated with the spinach mixture.
Serve with tandoori roti, naan or fulkas or even with steamed rice.

Creamy Pasta in White Sauce with Spicy Chicken Sausages

I generally never buy sausages - just because, we have never really found a creative way to eat them. As a family, we do not like to eat sausage for breakfast or even as a sandwich in a hot-dog bun. We have tried those breakfast sausages and have liked the spicy Italian ones the best, it has been used as a pizza topping more then often. We have even tried the seafood sausages - we liked them out of their casing and used as a pizza topping or as a part of a pasta dish.
The other day I found these spicy cilantro and green chilis chicken sausages - the flavor combination looked nice and hence we bought it.
Pasta was the thing that came to mind the day my kiddo said she wanted to have chicken pasta. We had a super busy weekend - a birthday party on a Saturday which went on till late at night, and then we had a communion to attend to on Sunday morning - I was exhausted by the evening. But, the smile on Little Miss A's face and her cute way of asking gave me the energy and the inspiration.
Its actually a pretty dish and takes some time. But, the best prize and the biggest compliment was when she ate away her bowl of pasta without wasting any time and without dropping anything in the floor.

The sausages are always in a pork casing - for people who do not eat pork - you can substitute with marinated pieces of chicken or just have it with some other veggies like peppers, corn, olives etc etc.

Ingredients

2 cups penne pasta - I used a variety of shapes
4 chicken sausages
2 cups broccoli florets - cut into bite size pieces
2 medium carrots - sliced into circles
1 medium onion - roughly chopped
2 teaspoons olive oil (any oil will work)
2 cloves garlic - grated
1 cup milk
1 tablespoon butter
2 tablespoons flour (all purpose flour)
1 teaspoon ground black pepper
salt to taste

Method

In a saucepan add 5 cups of water. Cover it and let this water come to a boil. Once it boils, add 1 teaspoon salt and then the pasta and cook for about 8 minutes. Generally that's the time it takes to cook those packaged pasta. Do check the cooking instructions to see otherwise.
Once its cooked, drain it in a colander and add 1 teaspoon oil and toss it around the colander, so that the pasta does not stick together.
Remove the chicken sausages from their casing and slice it. In a frying pan, add these slices and let them cook through. Sausages generally have oil in them so you do not need greasing. Cook it on medium heat till its cooked through, about 10 minutes. Remove onto a plate. In the same pan add 1 teaspoon oil and add the chopped onions. Once the onions get translucent, add the broccoli florets and the carrots. Add salt to taste and cover and cook for 5 minutes. Remove them into the same plate as the chicken sausages.
Now to make the sauce. Take a saucepan, add the butter to it. When it gets hot, add the grated garlic and bring the heat to a medium - be careful not to burn it. Now add the flour and mix well. Keep stirring for about 5 minutes to get the raw smell of the flour out. Now add the milk and keep stirring so as to not form any lumps. I generally use a whisk and it does not create any lumps. Add salt to taste and the crushed black pepper. Let this mixture come to a boil and then let it simmer for 5 minutes. To this add the cooked pasta and the chicken and veggies. Mix well. Garnish with chopped parsley (I did not have any) and serve with a side of garlic bread.

Friday, August 22, 2014

Quick Chicken Tagine with Vegetables, Olives and Preserved Lemons

I finally gave in to my temptation and bought a tagine pot. I had been wanting one since forever now. Well, that tagine pot sat on my kitchen counter tempting me to cook something in it for a few days. But, we were travelling and I had to wait. Well, yesterday was the day I finally had everything that I needed and I just started. Like someone had suggested....... make the cooking pot your canavas and just go about with things
- the end result will always be good if you make something with love, passion and a lot of confidence. So - with that thing in mind I whipped up this quick stuff. Do not know if its authentic or no - but, we loved it and thats all that matters in the end.


Ingredients

For Marination

8 chicken drumsticks or 6 chicken thighs (I used it with the bone and skin on)
1 tablespoon ginger garlic paste
1/2 teaspoon turmeric powder
1 teaspoon chili powder
1/2 teaspoon salt
1 tablespoon oil

For the Tagine

2 onions - roughly chopped
2 carrots - roughly chopped in chunks
2 bell peppers (I used red ones) - roughly cubed
4 potatoes - skins removed and cut in quarters
10 cloves of garlic - grated
1/2 inch ginger piece - grated
1/2 Preserved Lemons - chopped fine
10 black olives - halved
10 green olives - halved
6 pimentos - finely chopped
        I got the olives and pimentos (they were brined) at the olive bar at Wholefoods (a grocery store)
1/2 cup chopped parsley
1/2 cup chopped cilantro
1/4 teaspoon saffron strands
           if you do not wish to use saffron - substitute with 1/2 teaspoon turmeric and 2 to 5 strands of saffron
1/2 teaspoon chilli powder (add more or less as per preference)
1 tablespoon coriander powder
1/2 cup water
1 tablespoon oil
salt if needed (I did not add any salt - as the olives and the preserved lemon had enough salt)

Method

Get the tagine pot ready by reading the instructions provided. I had to soak my clay pot in water for 5 hours before I could use it.
Marinate the chicken drumsticks (or thighs) using all the ingredients under the 'For Marination' tab and let it sit for atleast 1 hour. I left it in the refrigerator overnight. 
Heat a frying pan and once its nice and hot sear the chicken drumsticks/thighs on both sides to get the meat brown. You do not need to cook the chicken, just get a nice sear on the outer layer.

Seared Chicken Drumsticks
In the same frying pan, add the 1/2 tablespoon oil. When it gets nice and hot add the chopped onions and saute them till they get a nice golden brown. Then add the garlic and ginger and saute till the raw smell goes away. Add the chopped carrots, chopped bell pepper and the quartered potatoes and mix well. Lower the flame. Make a paste of the saffron, chilli powder and coriander powder with the 1 cup water and add it to the vegetables. Add the chopped parsley and chopped cilantro (keep about 1 tablespoon of each aside for garnish later). Mix well. Get the frying pan off the heat and keep it aside. Its now time to assemble everything into the tagine pot.

Sauteed Vegetables
Chopped Olives, Pimentos and Preserved Lemons
I used a heat diffuser to get the tagine evenly heated and to avoid any direct contact with the heat. Its a delicate piece of equipment (the tagine) and I did not want any cracks on it.
In the tagine pot add 1/2 tablespoon oil and then add the sauteed vegetables. Arrange the chicken evenly over the vegetables. Over this add the chopped olives, pimentos and the preserved lemons.

Arranged in the tagine pot
Cover it with the conical shaped tagine cover. Lower the heat to a medium low. Cook it this way for an hour. The aromas will be like heaven, but do not open the cover. Let it cook on its own in those juices.

The Chicken Tagine being cooked over medium low heat with the use of a diffuser under the tagine pot.
After an hour, open very carefully, the cover will be hot. Check the meat for doneness. If its still a bit undone, cover and cook for another 15 to 20 minutes. Serve the cooked dish over a bed of couscous or some Pita Bread along with a simple Salad.

The final product
It is not really necessary to own a tagine pot to cook tagines. You can do this slow cooking even in a crock-pot or a dutch oven.

Preserved Lemons

I have always wanted to cook Moroccan and Mediterranean food. I even got a tagine for myself. One of the key ingredients used in the food there is preserved lemons. Firstly it was very very difficult to find them and then when I found the bottle, it was way too expensive.
I thought to myself - preserved lemons is like the simple humble lemon and salt pickle that my grandma (Mom's Mom) used to make - and boy.... it has been preserved for over 50 years now. I remember mom used to get that antique bottle of the lemon and salt pickle to serve with the humble dal and rice when we were sick - as that would give some taste to the the otherwise no taste in the mouth.
So, I made the preserved lemons myself and I can say I am very happy. Now to conquer Moroccan and Mediterranean cuisine.


Ingredients

8 yellow lemons
6 tablespoons Himalayan Pink Salt (you can use any coarse salt)
1 teaspoon chilli powder (optional)
1 tablespoon vinegar (optional - I used it as a preservative)


Method

Wash ans scrub the lemons really really well. wipe them clean and let them dry on a towel for about an hour. Cut the stem or the stub off the lemon. Now cut the lemon into quarters - do not cut through - keep about 1/4 inch intact at the bottom.  Do this for 6 lemons.
The other two lemons get the juice out of them and mix in the vinegar and let it sit.
Open up the lemon gently on the cut area and sprinkle the salt inside it generously. Do the same with the other 5 lemons.
Use a nice and dry jar - big enough to hold six lemons and juice. Add some salt at the bottom and a pinch of the chili powder. Squish one lemon into the jar and really squish till you see the juices coming out. and filling the jar. Add a pinch of chilli powder and squish another lemon in the same way. Layer with chili powder and squish another lemon. Repeat this till all six lemons are packed inside the jar. Add any leftover salt and chili powder and then add the lemon juice with vinegar mixed in it. Note that the lemon juice should cover all the lemons to the very top.
Cover it and let it sit in a dry and dark place for about 2 weeks. Keep turning the bottle upside down atleast 2 time every day during these 2 weeks.
The rind gets softer and thats when the lemons are ready.
You can store this in the refrigerator for 6 months.

You can add spices like cinnamon, bay-leaf, sage, peppercorns, fennel, clove, cardamom etc - alone or in combinations to make these too.

This is traditionally used in Moroccan cooking. But, I like it as a pickle with dal and rice or even curd and rice. I am planning to use it in some Indian curry too in place of tamarind - lets see how that plays.

Wednesday, August 20, 2014

Adai - my way!


Adai is a healthy meal in itself. Protein packed and with the use of vegetables, it becomes like a welcome home food. Easy to make and filling on the tummy. These savory pancakes from South India are a fun way of eating your lentils along with all the possible veggies.


Ingredients

1/2cup brown rice
1/4 cup white rice
1/4 cup tuvar dal/split pegion peas
1/4 cup moong dal/split moong beans
1/4 cup chana dal/split bengal gram
1/4 cup urad dal/split blag gram
1/4 cup masoor dal/split red lentils
1/4 cup whole moong
1 cup grated carrots
2 cups chopped spinach
1 onion - finely chopped
salt to taste
oil/butter for making adai


Method

Soak all the dals, brown rice, white rice and whole moong in enough water for atleast 8 hours. After 8 hours grind all of it to a very fine paste adding just enough water. The dough should be of thick dosa batter or pancake batter consistency. Add salt to taste and the grated carrot, chopped spinach and shopped onion and mix everything well. This batter does not need fermentation and hence can be used immediately to get adai.
Heat a tava or griddle and grease it with some oil or butter. Use a ladle and pour the adai batter on the greased tava/griddle and gently spread it with the base of the ladle to form a pancake. Adai is not like a crispy dosa, it is a little thicker like a pancake. spread some oil or melted butter on the top of the adai. Use a spatula and gently turn the adai once the lower side is golden brown. Get the same color on both sides. Serve hot with chutney and sambar.
We served our Adai with the coconut coriander chutney with yogurt

The other vegetables you can add are chopped pepper, chopped tomatoes, chopped kale, chopped dill leaves, chopped fenugreek leaves, chopped cabbage
you can even add grated beets to this batter - only it will become pink

Coconut & Coriander Chutney with Yogurt


Ingredients

For Chutney 

1 cup coriander/cilantro - chopped
4 green chilis (add more or less as per spice preference)
1/2 inch ginger root - chopped
1/2 cup grated coconut
10 curry leaves
1/2 cup yogurt
1/2 teaspoon sugar
1/2 teaspoon salt

 for tempering/tadka

1 teaspoon coconut oil
1/2 teaspoon black mustard seeds
1/2 teaspoon cumin seeds
1/2 teaspoon split black gram/udad dal (its white in color)
5 curry leaves
pinch of asafoetida/hing


Method

Add all the ingredients in the 'for chutney' tab into a grinder and grind to a very fine paste. The coconut should be ground very well.
Remove it into a serving bowl.
In a small pan, add the coconut oil. When it gets hot, add the mustard seeds and let them splutter. Then lower the heat and all the other ingredients in the 'for tempering/tadka' tab. Mix gently with a spoon till the split black gram becomes a golden color. Add this to the chutney in the bowl. Mix well and serve with dosa, adai, idli, uttapam.

Easy & Quick Baked Doughnuts with a Chocolate Ganache Glaze

My kiddo whom I lovingly refer to as 'Little Miss A' is a huge huge doughnut lover. She has loved those dunkin doughnuts for a long time. Now, she looks at pictures and asks me to make them at home. Guess, shes just like her Dad - ask mom to make something and she will do it types. No complains there. I love to cook food for these two most important people in my life - and it makes me very happy when I see them savoring every bite. Its like 'Mission Accomplished'
Now, traditional doughnuts are fried and then to top it they also have that sugary glaze - too many calories to indulge in on a regular basis. So, I was very fascinated when I saw these doughnut baking pans. I purchased one to make them for her. I saw quite a few recipes that used cake mix to make these baked doughnuts. I do not use cake mix and hence I kinda put baking these aside. Untill this Monday - 'Little Miss A' just sat breathing down my neck - saying doughnut doughnut since she woke up in the morning. So, the evening was spent in making these yummy fluffy treats.
She was happy - and I got the stamp of approval from her dad too.


Ingredients

For Doughnuts

1 cup All Purpose Flour/Maida
1/2 cup sugar
1/2 teaspoon baking soda
1/4 teaspoon salt
1/2 teaspoon vinegar
1/4 cup oil (I used canola)
1/4 cup yogurt
1/4 cup water
1 egg
1/2 teaspoon vanilla essence

For Chocolate Ganache Frosting

1/2 cup chocolate chips
2 teaspoons milk
1/2 teaspoon butter
colorfull funfetti for added garnish


Method

To make the Ganache

microwave the chocolate chips, milk and butter in a bowl at 30 second intervals 2 times. Mix well till you get a nice and velvety chocolate sauce. Let this sauce/ganache cool down before you frost the doughnuts.

To make the Doughnuts

Preheat oven to 375 degrees Fahrenheit.
Add sugar, salt, flour, baking soda in a mixing bowl. Mix well and let it sit aside.
In another mixing bowl add oil, yogurt, water, egg, vanilla essence, vinegar and mix well till everything is combined. Now add this mixture into the dry mixture and combine everything well. Do not overmix.
Grease your doughnut pan with oil. 
You can use an icing bag, a doughnut pouring bottle, those ketchup bottles you get or just a simple ziploc back (cut a small hole in the corner to pour the batter). Add the batter to the doughnut mould/pan - just fill half of it (as shown in the picture) 


Bake for 10 to 12 minutes till the tops turn a nice golden brown. Remove them from the pan and let them cool on a wire rack. The color should be like its in the picture below.


Dip the doughnut in the ganache and then let ti sit on the wire rack. You can sprinkle some funfetti for added color.
Savor with a cup of coffee or with a glass of milk.


We baked a total of 12 doughnuts with these measurements. If you do not have a doughnut pan - you can make them in a mini muffin pan (they will resemble doughnut holes) or even a cupcake pan (here the baking time may vary - just insert a toothpick and see its baked through in 12 to 15 minutes)

Chicken Kosha (A Bengali Take on Chicken Achari)

There was a time I used to be intimated to use mustard oil in cooking. But, over time I have understood how to cook with this humble but pungent ingredient.
If it is cooked properly - this oil can make anything taste divine and the golden hue that the dish gets on completion is a sight sent from heaven...... yes, that how I feel.
People who have disliked mustard oil - did not even know that this stuff was cooked in it and they lapped it up with the parathas that this dish was served with. Well.......... that a big compliment in itself.
In Bengal - they make a dish called 'Kosha Mangsho' which a layman calls as Chicken Kosha. I just gave it a twist by making it with the pickling spices.
It is still very much a Bengali dish I feel - as it has the use of mustard oil.


Ingredients

For Marination

2 pounds chicken - I used boneless skinless thighs cut into 2 inch pieces.
1 teaspoon kalonji/onion seeds
1 tablespoon mustard oil (mustard oil is preferred - but, you can use any oil that you are comfortable with)
1 teaspoon turmeric powder
1 teaspoon chilli powder
1/2 teaspoon salt
1  teaspoon ginger garlic paste

For Achari Masala

5 green cardamoms
5 cloves
1 inch cinnamon stick
1 bay leaf/tejpatta
1 tablespoon fennel seeds/saunf
1 teaspoon cumin seeds/jeera
1 teaspoon mustard seeds
1 tablespoon whole coriander seeds
1/8 teaspoon fenugreek seeds/methi seeds
5 to 6 dries kashmiri chili (you can add more or less as per your spice preference)
1/2 teaspoon asafoetida/hing

For Curry

1 tablespoon mustard oil (mustard oil is preferred - but, you can use any oil that you are comfortable with)
1 inch cinnamon stick
1 bay leaf/tejpatta
2 big oinions - finely chopped
2 big tomatoes - chopped
1 teaspoon ginger garlic paste
1/2 cup beaten yogurt.
1/2 cup water
salt to taste
chopped cilantro for garnish

Method

Marinate the chicken pieces with all the ingredients mentioned under the 'for marination' tab and let it sit for 1 to 2 hours in a refrigerator.
In the mean time - dry roast the ingredients under the 'for achari masala' tab one by one except the asafoetida. Be careful to roast them on a low medium flame and do not burn the whole masalas. Once they are cooled down, grind it to a coarse powder in a grinder. over and keep it aside.
In a kadahi or saucepan or Pan - add 1 tablespoon of mustard oil and let it come to smoking point. Then lower the heat. To this add 1 cinnamom piece and 1 tejpatta. Now add chopped onions and fry till they turn a golden brown. Now add 1 teaspoon ginger garlic paste and mix till the raw smell goes off. Then add chopped tomatoes and saute till the oil leaves the sides of the pan. Now get the pan off the heat and stir in 1/2 cup of yogurt. Mix well. Keep it back on the gas stove and keep mixing - be careful that the yogurt does not curdle. Now add the masala powder and salt as per taste and mix well. Add 1/2 cup of water and the chicken pieces. Cover and let it cook for 20 to 30 minutes on medium flame. Check if the chicken is cooked. Adjust the salt. Garnish with chopped cilantro and serve with roti or rice.

Sunday, July 20, 2014

Bread Pudding


I always wondered how this bread pudding tasted - the recipe always made use of stale bread and eggs with milk and spices together baked to a golden brown - served with ice-cream and some kind of sauce....... which was generally a bourbon sauce as bread pudding is a delicacy from the Southern States of America where bourbon and whiskey are loved plenty.
I had tasted this amazing bread pudding at our favorite restaurant "Bubba Gump" and had fallen in love with the bread, nutmeg and cinnamon together with that awesome sauce.
Had been wanting to recreate this dish for a long time - but, never came around to making it. The other day I had baked white bread at home and somehow it was not used up. Home made bread tends to get spoilt in 2 days. Hence had to use it up. That's when the hubby asked me to make this dish.
The recipe is a little bit from here, a little from there. Frankly, its the same recipe if you see it everywhere, just a teaspoon extra of this or a pinch more of that.


Ingredients

7 cups bread - bite size pieces of white bread or baguette
2 tablespoons butter - melted
2 cups milk
2 cups sugar - you can use brown sugar to get that brown color.
1 teaspoon cinnamon powder
1 teaspoon nutmeg powder
1/2 teaspoon allspice powder
4 eggs
1/2 cup black raisins
1/2 cup pecans - chopped


Method

Preheat the oven to 350 degrees Fahrenheit. On a cookie sheet spread the bread pieces and then cover the bread with the melted butter. Put this cookie sheet int he oven and get the bread a little crisp, say for 10 minutes. In the meantime - in a big mixing bowl take the milk, sugar, spices and eggs and mix well and make it into a custard. Add the raisins and the pecans and then the crisp bread to the mixing bowl and cover the bread with the custard mixture. Take a 13X9 baking dish and grease it. Now add the bread and custard mixture to it. Bake it in 350 degrees Fahrenheit oven for 45 minutes. If the top starts getting brown, just cover it with an aluminum foil and bake for the full 45 minutes.
Serve with vanilla ice-cream and chocolate sauce.

You can just add a bit extra zing to this pudding by soaking the raisins and the pecans in 1/4 cup bourbon for 24 hours (or more) and then use it to make the bread pudding. It will be a slight bit boozy and will have a southern kick to it.

Tuesday, July 15, 2014

Quick Guacamole (in the food processor)


It was one of those wintry February evenings when we were just too bored and were trying to think of what to do to make it a fun evening - the winter this year was too harsh and most of the times we were stuck inside the home.
So, it was going to be movie time with some chips and store bought salsa. But, then I saw this beautiful avacado that was sitting on my kitchen counter saying so lovingly....... pick me up.
So, we quickly whipped up this guacamole in the mini chopper (the handheld one) and savored it with some corn chips while watching Ice Age.


Ingredients

1 avocado
1/2 red onion
1/2 tomato
1 green chilli (you can add more if you want the heat)
juice of half a lemon
salt to taste
1/2 teaspoon black pepper (optional)
Chopped cilantro for garnishing (I did not have any cilantro and hence there is no garnish in the pictures)

Method

Cut the avocado, remove the seed and scoop the flesh into a mini chopper. To this add the onion, tomato and green chili, lemon juice, salt & peppers and mix in a pulse motion 5 to 6 times. Garnish with chopped cilantro. Savor with chips
Snack time - guacamole and chips.

Wednesday, April 30, 2014

Pretzel (Jalapeno & Pepper-jack cheese stuffed) - We Knead to Bake # 8

Bread #8 for the month of August in the year 2013 that we at "We Knead to Bake" were going to bake was hard pretzels.
After moving to the United States - hard pretzels were a delicacy and we used to eat it like the sev gathia (Indian snacks) that you get in India - I distinctly remember the same mention in one hindi movie too ........ sorry cannot recall the name of the movie - but do remember the actor who said it - it was Paresh Rawal.
So when Aparna who pens at My Diverse Kitchen gave us an option to bake soft pretzels if we liked - I said yes to it.
I had a soft pretzel only once at a mall. It was stuffed with cheese and pepperoni and had a nice sprinkle of white crystals of salt on top. I wanted to bake this one. However, could not use pepperoni as we were having guests over and they did not eat pork. So, the idea of the stuffing was some spicy cheese with jalapenos - hence the pepper jack cheese and jalapenos stuffed pretzels came into being in our kitchen.
Loved making these pretzels and stuffing them. We had it with a side of nacho cheese and some marinara sauce.
Again - an awesome bread that we made int eh group - a new learning for me.

I had baked this bread in time for the group - but, due to health reasons I could not write a blogpost and hence it is coming a tad bit late here on my blog. But....... as the saying goes........... its better late than never.

I adapted this recipe from "Guy Fieri - on the food network" & from "My Diverse Kitchen"


Ingredients

1 1/2 cups warm water, 110 degrees F
2 packages active dry yeast
1 teaspoon salt
1 tablespoon sugar
4 cups all-purpose flour, plus 1/2 cup for work surface
2 eggs
2 tablespoons milk
2 cups grated pepper jack cheese
4 jalapenos (seeds and veins removed) - chopped fine
2 tablespoons coarse sea salt


Method

Mix the yeast, sugar and warm water and let it sit for about 15 minutes till it gets nice and frothy - this is to proof the yeast.
You can mix this dough by hand too - however, I used my stand mixer. In a food processor or a stand mixer, using the dough blade combine the flour and the salt. Add one egg and the frothy yeast mixture and mix until the dough comes together.  Do not over mix, you just want the dough to come together.  Turn out onto a lightly floured surface and knead a few times with your hands.  If dough feels sticky, add a little more flour.  Form the dough into a ball and make 12 equal portions of the dough.
Grate the pepperjack cheese and chop the jalapenos and keep them together on your work surface - I divided them into 12 equal portions each (as we were going to have 12 pretzels)
Roll one portion of the dough into a rectangle shape as shown in the above picture. Add one portion of the pepperjack cheese and jalapeno mixture. Roll the strip into a tube and form into a pretzel shape by looping and crossing the ends over each other, then tuck back onto the loop and pinch to seal.  Transfer to a baking sheet covered with parchment paper.  Repeat with remaining portions.
Preheat oven to 425 degrees.  In a small bowl, combine remaining egg and milk.  Whisk to combine and set aside.  In another small bowl take the coarse sea salt.  Brush the pretzels liberally with the egg wash, then sprinkle with sea salt.  Bake 18-20 minutes until light golden brown.  Transfer pretzels to a wire rack to cool. Serve with cream cheese and hot coffee.

Saturday, April 19, 2014

Moong & Udad Dal Koftas in a Coconut Sauce


I met Anu (Anupama) Rao at a party - her bindaas nature and her totally infectious smile and her jokes were what made us bond as friends that evening. Little did I know that this is the same Anu who writes the beautiful blog Allergy Foodie. I was thrilled and it felt like I had met a celebrity - I guess, I mentioned it to her when we connected on facebook. Needless to say - shes become a friend.
She planned to have a allergy friendly cookout along with 4 food bloggers from around  in the warmth of her kitchen in the evening today  (19 April). Sadly, I am not going to be a part of it, due to health reasons. But, I wanted to make a contribution.
Anu had given each of us a list of what we need to avoid. Here is the list that was provided to us.
  • Wheat (including oats, spelt, barley)
  • Tree nuts (Almond, cashew, pistachios, Brazil nuts, hazel nuts etc.)
  • Peanuts
  • Dairy (Milk, Yogurt, Cheese) 
  • Soy
  • Eggs
  • Fish
  • Shell Fish
  • Mustard
  • Poppy seeds
  • Sunflower seeds
  • Chick Peas (Chana daal,  besan etc.)

Well, my thinking cap came out of the closet and I started to think of the ingredients I could use to make something tasty and allergy friendly. After a lot of this and that and again a this and that - I finally came up with the idea of a kofta curry that could be made with whole moong (green gram) and whole udad (black gram) in a rich coconut milk based curry that is infused with fresh ground spices and fresh methi (fenugreek) leaves. I hope this meets the criteria - will wait for a verdict from Anu.


Ingredients

2 medium potatoes - boiled and mashed
1 teaspoon ginger paste
2 teaspoons garlic paste
2 cups finely chopped onions
2 cups chopped  fresh fenugreek leaves (methi)
1 and 1/2 teaspoon turmeric powder
2 teaspoons kashmiri chili powder
1/4 teaspoon asafoetida (hing)
1/2 teaspoon brown sugar or grated jaggery
1 can coconut milk
2 cups water
1 tablespoon coconut oil
salt to taste
oil for deep frying the koftas

Soaked in enough water for 12 hours

1/2 cup whole moong (green gram)
1/2 cup whole udad (black gram)

For fresh ground spice mixture

1 teaspoon fennel seeds (saunf)
1 teaspoon cumin seeds (jeera)
2 teaspoons coriander seeds (akha dhania)
2 green cardamoms (elaichi)
5 cloves (lavang)
1/2 inch cinnamon stick (dalchini)
5 kabab chini/nagkesar (cobra saffron)


Method

Dry roast all the spices mentioned in the 'to grind' section and then grind them to a coarse powder, make two parts of it and keep them aside.
Coarsely grind the soaked moong and udad and add in the mashed potatoes and half cup of chopped onions. Then add one portion of the ground spice, 1/2 teaspoon turmeric powder, asafoetida and 1/2 teaspoon salt (you can add more or less as per preference or taste). Mix everything well. Heat oil in a karahi for deep frying. When it gets hot - put the flame on a medium and make balls of the dal mixture and fry them till they are nice and crispy on the outside - it should take about 5 to 7 minutes for 6 balls at a time. Drain them on a paper towel and let them sit aside to cool.
In a saucepan, add the coconut oil. When it gets hot, add the remaining chopped onions and fry till they turn a nice golden color. Add the ginger paste and the garlic paste and saute for about a minute till the raw smell goes away. Add the chopped fenugreek leaves and mix well till all the leaves are wilted and give a nice fenugreeky (if such a name exists) smell. Add the 1 teaspoon turmeric powder, chilli powder, the other portion of the spice mixture, salt to taste and mix well. Get the saucepan off the heat and add the coconut milk and stir very well. Add 2 cups of water and mix well. Get the saucepan back on the flame and cover it and let the mixture come to a boil. Once it starts boiling, lower the heat and bring it to a simmer - add the kofta balls to the sauce. Cover and let the sauce and koftas mix and mingle on the simmer for about 10 minutes. Kofta curry is ready.
You can have it with Rice, Rotis (allergy friendly ones) OR as we did it - we served the kofta on a bed of boiled rice noodles ........ my husband called it a very fancy way of eating your 'Dal & Chawal'


Tuesday, April 15, 2014

Haleem (Khichda) in Slow Cooker


I never had haleem in my life - yeah yeah yeah! I never had haleem in my life untill today when we made it at home. I always wanted to make this since we purchased a slow cooker/crockpot. I never got to making it............. blame it on a lot of things.
I saw a post from Shruti (a friend I made on facebook) on her blog about a vegetarian haleem, the recipe is here - and I wanted to cook it and eat it ever since. Finally over the weekend, we went to the halal shop and got some 'mutton' and today on this rainy and cold day we had this yummm stuff for dinner along with some yogurt and cucumber/onion salad. The aroma of the spices, the onions friend in ghee and ofcorse the cooked haleem takes you right to heaven.


It is indeed a very rich preparation with all that ghee (clarified butter) and those pulses/dals and those exotic spices. But, at the same time, it is a complete meal packed with proteins and some carbohydrates too. All this one pot meal needs as an accompaniment is some salad and yogurt.
I did not follow any recipe here. Just added all the dals and the cracked wheat and the mutton along with onions, tomatoes and the likes and slow cooked it for almost 9 hours.
The spice mixture did have a spice that was used by Shruti - its called kabab chini or nagkesar or cobra saffron. I just made the spice mixture as I make it for most of the Indian food that I cook at home.
Since it was cooked in the slow cooker - the effort seemed minimal too.
This can surely be cooked in the pressure cooker too. Ofcorse it will cook faster there  and not take 9 hours like the slow cooker - but then, there is something else about slow cooking which makes it very special.


Ingredients

1 pound mutton (boneless pieces)
1/2 teaspoon turmeric powder
2 tablespoons yogurt
2 onions - sliced
1 tomato - roughly chopped
11 garlic cloves - grated
1 inch ginger - grated
1 teaspoon turmeric powder
4 teaspoons kashimiri chili powder (more or less as per taste)
4 teaspoons dhaina jeera powder (coriander and cumin powder)
1/4 cup quick oats (I used Quaker oats)
2 teaspoons salt (more or less as per taste)
5 cups water
1/4 cup oil
1/4 cup ghee
1 onion - thinly sliced
cilantro for garnish

to grind
1 teaspoon fennel seeds
2 bay leaves
4 green cardamom pods
7 cloves
1 black cardamom
1 inch cinnamon
4 nagkesar/kabab chini
1/2 teaspoon peppercorns

to soak
1/4 cup moong dal (split green gram)
1/4 cup tuvar dal (split pigeon peas)
1/4 cup masoor dal (split red lentils)
1/4 cup chana dal (split chick peas)
1/4 cup udad dal (split black gram)
1/2 cup cracked wheat
1/4 cup quinoa


Method

Marinate the mutton pieces with the yogurt and the turmeric and let it sit for atleast 2 hours - overnight is best.
Wash the ingredients under the 'to soak' heading about 4 times and then add enough water and let them soak for 2 hours.
Dry roast the ingredients under the 'to grid' heading untill a nice aroma comes about. Let it cool and then grind it to a fine powder in a spice grinder.
In a karahi, add the 1/4 cup oil. When it gets hot, add the 2 onions and fry till they get a nice golden brown. Add the ginger and garlic and fry for about 3 to 4 minutes till the raw smell of the garlic disappears.
Get the crockpot/slow cooker started - Put in the onions and the ginger garlic first. Add the mutton pieces next along with the chopped tomatoes. Add the turmeric powder, chilli powder, dhania jeera powder the ground spice mixture. Now add the soaked dals and cracked wheat. Add 5 cups of water and give it a nice mix with a spoon to get all the powders mixed well with the water. Put the crockpot on high for 5 hours and cover it.
After 5 hours, the dal and wheat  will have cooked and the meat will be tender. With a hand mixer/blender, blend the mixture well till you get a nice porridge consistency. If the mixture is very thick, add about half cup of water and mix well. Now add oats and salt and mix it again. Put the crockpot on low this time and cover and cook for 3 to 4 hours.
In the meantime, fry the 1 onion that is thinly sliced in the 1/4 cup of ghee untill it is brown and crispy. Keep it aside.After 3 to 4 hours of slow cooking on low, the haleem is ready. Check it for salt or spice and add according to your liking.
To serve Haleem - take a serving in a bowl, add a teaspoon (you can add more if you like) of the ghee in which the onions were fried, garnish with chopped cilantro and fried onions - serve with a side of salad and yogurt.

This recipe yielded 7 servings of Haleem.


Haleem is essentially made with beef or mutton - but, it can be made with chicken too. You can also make a vegetarian version by adding veggies like carrots, potatoes, beans, bell peppers along with some soy nuggets (nutella).