Wednesday, April 30, 2014

Pretzel (Jalapeno & Pepper-jack cheese stuffed) - We Knead to Bake # 8

Bread #8 for the month of August in the year 2013 that we at "We Knead to Bake" were going to bake was hard pretzels.
After moving to the United States - hard pretzels were a delicacy and we used to eat it like the sev gathia (Indian snacks) that you get in India - I distinctly remember the same mention in one hindi movie too ........ sorry cannot recall the name of the movie - but do remember the actor who said it - it was Paresh Rawal.
So when Aparna who pens at My Diverse Kitchen gave us an option to bake soft pretzels if we liked - I said yes to it.
I had a soft pretzel only once at a mall. It was stuffed with cheese and pepperoni and had a nice sprinkle of white crystals of salt on top. I wanted to bake this one. However, could not use pepperoni as we were having guests over and they did not eat pork. So, the idea of the stuffing was some spicy cheese with jalapenos - hence the pepper jack cheese and jalapenos stuffed pretzels came into being in our kitchen.
Loved making these pretzels and stuffing them. We had it with a side of nacho cheese and some marinara sauce.
Again - an awesome bread that we made int eh group - a new learning for me.

I had baked this bread in time for the group - but, due to health reasons I could not write a blogpost and hence it is coming a tad bit late here on my blog. But....... as the saying goes........... its better late than never.

I adapted this recipe from "Guy Fieri - on the food network" & from "My Diverse Kitchen"


Ingredients

1 1/2 cups warm water, 110 degrees F
2 packages active dry yeast
1 teaspoon salt
1 tablespoon sugar
4 cups all-purpose flour, plus 1/2 cup for work surface
2 eggs
2 tablespoons milk
2 cups grated pepper jack cheese
4 jalapenos (seeds and veins removed) - chopped fine
2 tablespoons coarse sea salt


Method

Mix the yeast, sugar and warm water and let it sit for about 15 minutes till it gets nice and frothy - this is to proof the yeast.
You can mix this dough by hand too - however, I used my stand mixer. In a food processor or a stand mixer, using the dough blade combine the flour and the salt. Add one egg and the frothy yeast mixture and mix until the dough comes together.  Do not over mix, you just want the dough to come together.  Turn out onto a lightly floured surface and knead a few times with your hands.  If dough feels sticky, add a little more flour.  Form the dough into a ball and make 12 equal portions of the dough.
Grate the pepperjack cheese and chop the jalapenos and keep them together on your work surface - I divided them into 12 equal portions each (as we were going to have 12 pretzels)
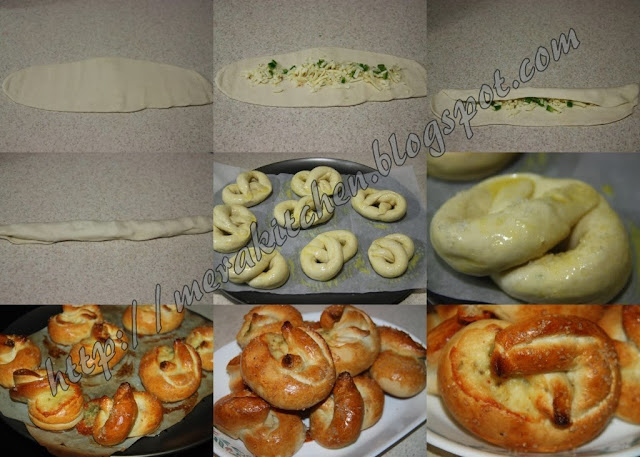
Roll one portion of the dough into a rectangle shape as shown in the above picture. Add one portion of the pepperjack cheese and jalapeno mixture. Roll the strip into a tube and form into a pretzel shape by looping and crossing the ends over each other, then tuck back onto the loop and pinch to seal.  Transfer to a baking sheet covered with parchment paper.  Repeat with remaining portions.
Preheat oven to 425 degrees.  In a small bowl, combine remaining egg and milk.  Whisk to combine and set aside.  In another small bowl take the coarse sea salt.  Brush the pretzels liberally with the egg wash, then sprinkle with sea salt.  Bake 18-20 minutes until light golden brown.  Transfer pretzels to a wire rack to cool. Serve with cream cheese and hot coffee.

Saturday, April 19, 2014

Moong & Udad Dal Koftas in a Coconut Sauce


I met Anu (Anupama) Rao at a party - her bindaas nature and her totally infectious smile and her jokes were what made us bond as friends that evening. Little did I know that this is the same Anu who writes the beautiful blog Allergy Foodie. I was thrilled and it felt like I had met a celebrity - I guess, I mentioned it to her when we connected on facebook. Needless to say - shes become a friend.
She planned to have a allergy friendly cookout along with 4 food bloggers from around  in the warmth of her kitchen in the evening today  (19 April). Sadly, I am not going to be a part of it, due to health reasons. But, I wanted to make a contribution.
Anu had given each of us a list of what we need to avoid. Here is the list that was provided to us.
  • Wheat (including oats, spelt, barley)
  • Tree nuts (Almond, cashew, pistachios, Brazil nuts, hazel nuts etc.)
  • Peanuts
  • Dairy (Milk, Yogurt, Cheese) 
  • Soy
  • Eggs
  • Fish
  • Shell Fish
  • Mustard
  • Poppy seeds
  • Sunflower seeds
  • Chick Peas (Chana daal,  besan etc.)

Well, my thinking cap came out of the closet and I started to think of the ingredients I could use to make something tasty and allergy friendly. After a lot of this and that and again a this and that - I finally came up with the idea of a kofta curry that could be made with whole moong (green gram) and whole udad (black gram) in a rich coconut milk based curry that is infused with fresh ground spices and fresh methi (fenugreek) leaves. I hope this meets the criteria - will wait for a verdict from Anu.


Ingredients

2 medium potatoes - boiled and mashed
1 teaspoon ginger paste
2 teaspoons garlic paste
2 cups finely chopped onions
2 cups chopped  fresh fenugreek leaves (methi)
1 and 1/2 teaspoon turmeric powder
2 teaspoons kashmiri chili powder
1/4 teaspoon asafoetida (hing)
1/2 teaspoon brown sugar or grated jaggery
1 can coconut milk
2 cups water
1 tablespoon coconut oil
salt to taste
oil for deep frying the koftas

Soaked in enough water for 12 hours

1/2 cup whole moong (green gram)
1/2 cup whole udad (black gram)

For fresh ground spice mixture

1 teaspoon fennel seeds (saunf)
1 teaspoon cumin seeds (jeera)
2 teaspoons coriander seeds (akha dhania)
2 green cardamoms (elaichi)
5 cloves (lavang)
1/2 inch cinnamon stick (dalchini)
5 kabab chini/nagkesar (cobra saffron)


Method

Dry roast all the spices mentioned in the 'to grind' section and then grind them to a coarse powder, make two parts of it and keep them aside.
Coarsely grind the soaked moong and udad and add in the mashed potatoes and half cup of chopped onions. Then add one portion of the ground spice, 1/2 teaspoon turmeric powder, asafoetida and 1/2 teaspoon salt (you can add more or less as per preference or taste). Mix everything well. Heat oil in a karahi for deep frying. When it gets hot - put the flame on a medium and make balls of the dal mixture and fry them till they are nice and crispy on the outside - it should take about 5 to 7 minutes for 6 balls at a time. Drain them on a paper towel and let them sit aside to cool.
In a saucepan, add the coconut oil. When it gets hot, add the remaining chopped onions and fry till they turn a nice golden color. Add the ginger paste and the garlic paste and saute for about a minute till the raw smell goes away. Add the chopped fenugreek leaves and mix well till all the leaves are wilted and give a nice fenugreeky (if such a name exists) smell. Add the 1 teaspoon turmeric powder, chilli powder, the other portion of the spice mixture, salt to taste and mix well. Get the saucepan off the heat and add the coconut milk and stir very well. Add 2 cups of water and mix well. Get the saucepan back on the flame and cover it and let the mixture come to a boil. Once it starts boiling, lower the heat and bring it to a simmer - add the kofta balls to the sauce. Cover and let the sauce and koftas mix and mingle on the simmer for about 10 minutes. Kofta curry is ready.
You can have it with Rice, Rotis (allergy friendly ones) OR as we did it - we served the kofta on a bed of boiled rice noodles ........ my husband called it a very fancy way of eating your 'Dal & Chawal'


Tuesday, April 15, 2014

Haleem (Khichda) in Slow Cooker


I never had haleem in my life - yeah yeah yeah! I never had haleem in my life untill today when we made it at home. I always wanted to make this since we purchased a slow cooker/crockpot. I never got to making it............. blame it on a lot of things.
I saw a post from Shruti (a friend I made on facebook) on her blog about a vegetarian haleem, the recipe is here - and I wanted to cook it and eat it ever since. Finally over the weekend, we went to the halal shop and got some 'mutton' and today on this rainy and cold day we had this yummm stuff for dinner along with some yogurt and cucumber/onion salad. The aroma of the spices, the onions friend in ghee and ofcorse the cooked haleem takes you right to heaven.


It is indeed a very rich preparation with all that ghee (clarified butter) and those pulses/dals and those exotic spices. But, at the same time, it is a complete meal packed with proteins and some carbohydrates too. All this one pot meal needs as an accompaniment is some salad and yogurt.
I did not follow any recipe here. Just added all the dals and the cracked wheat and the mutton along with onions, tomatoes and the likes and slow cooked it for almost 9 hours.
The spice mixture did have a spice that was used by Shruti - its called kabab chini or nagkesar or cobra saffron. I just made the spice mixture as I make it for most of the Indian food that I cook at home.
Since it was cooked in the slow cooker - the effort seemed minimal too.
This can surely be cooked in the pressure cooker too. Ofcorse it will cook faster there  and not take 9 hours like the slow cooker - but then, there is something else about slow cooking which makes it very special.


Ingredients

1 pound mutton (boneless pieces)
1/2 teaspoon turmeric powder
2 tablespoons yogurt
2 onions - sliced
1 tomato - roughly chopped
11 garlic cloves - grated
1 inch ginger - grated
1 teaspoon turmeric powder
4 teaspoons kashimiri chili powder (more or less as per taste)
4 teaspoons dhaina jeera powder (coriander and cumin powder)
1/4 cup quick oats (I used Quaker oats)
2 teaspoons salt (more or less as per taste)
5 cups water
1/4 cup oil
1/4 cup ghee
1 onion - thinly sliced
cilantro for garnish

to grind
1 teaspoon fennel seeds
2 bay leaves
4 green cardamom pods
7 cloves
1 black cardamom
1 inch cinnamon
4 nagkesar/kabab chini
1/2 teaspoon peppercorns

to soak
1/4 cup moong dal (split green gram)
1/4 cup tuvar dal (split pigeon peas)
1/4 cup masoor dal (split red lentils)
1/4 cup chana dal (split chick peas)
1/4 cup udad dal (split black gram)
1/2 cup cracked wheat
1/4 cup quinoa


Method

Marinate the mutton pieces with the yogurt and the turmeric and let it sit for atleast 2 hours - overnight is best.
Wash the ingredients under the 'to soak' heading about 4 times and then add enough water and let them soak for 2 hours.
Dry roast the ingredients under the 'to grid' heading untill a nice aroma comes about. Let it cool and then grind it to a fine powder in a spice grinder.
In a karahi, add the 1/4 cup oil. When it gets hot, add the 2 onions and fry till they get a nice golden brown. Add the ginger and garlic and fry for about 3 to 4 minutes till the raw smell of the garlic disappears.
Get the crockpot/slow cooker started - Put in the onions and the ginger garlic first. Add the mutton pieces next along with the chopped tomatoes. Add the turmeric powder, chilli powder, dhania jeera powder the ground spice mixture. Now add the soaked dals and cracked wheat. Add 5 cups of water and give it a nice mix with a spoon to get all the powders mixed well with the water. Put the crockpot on high for 5 hours and cover it.
After 5 hours, the dal and wheat  will have cooked and the meat will be tender. With a hand mixer/blender, blend the mixture well till you get a nice porridge consistency. If the mixture is very thick, add about half cup of water and mix well. Now add oats and salt and mix it again. Put the crockpot on low this time and cover and cook for 3 to 4 hours.
In the meantime, fry the 1 onion that is thinly sliced in the 1/4 cup of ghee untill it is brown and crispy. Keep it aside.After 3 to 4 hours of slow cooking on low, the haleem is ready. Check it for salt or spice and add according to your liking.
To serve Haleem - take a serving in a bowl, add a teaspoon (you can add more if you like) of the ghee in which the onions were fried, garnish with chopped cilantro and fried onions - serve with a side of salad and yogurt.

This recipe yielded 7 servings of Haleem.


Haleem is essentially made with beef or mutton - but, it can be made with chicken too. You can also make a vegetarian version by adding veggies like carrots, potatoes, beans, bell peppers along with some soy nuggets (nutella).

Palakwala Chicken Keema (Chicken Mince with Spinach)

Chicken and fish are a staple at our home. My husband and now even my lil 4 year old always ask for chicken and/or fish at every meal. I have to find ways to add vegetables into the chicken and fish preparations just to give me the satisfaction that some veggies also form part of our diet.
let me not complain much - they do eat their salads without a fuss and even fruits - so, I guess there is a lot to be thankful for.
We generally have an American Meal plate with an Indian flair at home. Let me explain - its either a roasted piece of chicken or two OR maybe a fish fillet that has been baked in the oven along with some pulav/pilaf and some roasted cauliflower or brocolli or oven baked potato fries along with a big helping of salad (could be just chopped up cucumbers and carrots OR a full fledged salad with all the trimmings. Yup, thats what our everyday meal looks like atleast 3 times a week. Then ofcorse I have a dedicated vegetarian day on Thursdays - absolutely no meat served or cooked that day - and its been a fun challenge coming up with new ideas every Thursday. We do make elaborate Indian meals too - like the biryanis, the parathas, the kheers etc etc - but, a roti, sabzi, dal, chawal routine is a no no at our home. Well, we are foodies - whay else can I say.


Minced Chicken is awesome. I like it because it can take all the flavors in very quickly and you do not need to spend hours in the kitchen to get a fun bowl  like the one in the pictures. And the chicken keema can be used in many ways. You can just enjoy it with bread or chappati OR you could make stuffed buns ( thats what I plan to do the next time) OR you could make stuffed parathas with it (I had made them earlier, the recipe is here)


Ingredients

2 pounds minced chicken
2 tablespoons yogurt
1 teaspoon salt
1 big onion - finely chopped
1 big tomato - finely chopped
2 cups baby spinach - roughly chopped
9 cloves garlic - finely minced
1/2 inch ginger - finely minced
1 teaspoon garam masala powder
1 teaspoon chilli powder
1 teaspoon turmeric powder
1/8 cup oil


Method

In a karahi add oil. When it gets hot add the chopped onions and fry well till it turns a nice golden brown. Then add the tomatoes, cilantro, garlic and ginger and fry till the tomatoes are soft and oil starts leaving the mixture on the side of the karahi. Add the chopped spinach, chilli powder, turmeric powder and garam masala powder along with 1/2 teaspoon salt and mix well. Add the yogurt and the mince chicken and mix well and keep stirring for 10 minutes. Cover and let the chicken cook for 10 minutes more minutes. Remove the cover and let any water thats formed get evaporated. Check for seasoning and add salt or spices as per taste.

Monday, April 14, 2014

Savoury Kugelhoph - We Knead to Bake # 7

Month no. 7 and that means its time for bread #7. For the month of July Aparna decided tht we all should make a savory bread, as many had asked for it. Well, thats how the 'Kugelhoph' was decided.
I have learnt a lot from being a part of the 'We Knead to Bake' group and enjoy baking these yummy breads.
Aparna who pens at My Diverse Kithen  comes up with these new breads and there is a lot of leaning for someone like me.

Kugelhopf (also spelt as Kugelhupf, Gugelhupf, Gougelhof, Kugelhoph, Kugloff Kuelopf, Kouklouf, Köjlhopf, Koejelhopf, Koïlopf, Köjhupf!) is a yeasted sweet cake well known in the Alsace region of France, as well as in Germany, Switzerland, and Austria, and variations of this are also found in some countries of Eastern Europe


The note below is what I picked from wikipedia

A Gugelhupf, Guglhupf or Gugelhopf is a southern German, Austrian, Swiss and Alsatian term for a marble cake or Bundt cake. Supposedly the part "Gugel-" is a variation of the Middle High German word gugel (hood), and the part "-hupf" is a variation of "Hefe" (yeast). Folk etymology says that the "-hupf" part comes from the German word hüpfen (to jump), as the yeast dough literally "jumps out of" the cake pan.
In Hungary the spelling is kuglóf, in Croatia and Serbia the spelling is kuglof, in France kouglof and in Romania it's called guguluf. In the Czech Republic and Slovakia, it is called bábovka, and in Poland babka. In the Republic of Macedonia the cake is known as куглоф (transliterated, kuglof). In Upper Austria it has a different name: "Wacker" or "Wacka". In Slovenia, the standard word is šarkelj. In Western Slovenia, it is also known as kuglof, and in Central and Eastern Slovenia, kugluh.
A two-colored Czech version called "Bábovka". The dark brown portions of the crumb contain cocoa.
Gugelhupf is a big cake and has a distinctive ring shape or the shape of a torus. It is usually eaten with coffee, at coffee breaks.
Gugelhupf consists of a soft yeast dough which contains raisins, almonds and Kirschwasser cherry brandy. Some also contain candied fruits and nuts. Some regional varieties (Czech, Hungarian and Slovenian) are also filled, often with a layer of sweetened ground poppy seeds.
It is baked in a special circular pan with a central tube, originally made of enamelled pottery. Similar pans are used for making Bundt cakes, a cake baking pan shape in the US derived from the Gugelhupf.
The Gugelhupf was the sweet chosen to represent Austria in the Café Europe initiative of the Austrian presidency of the European Union, on Europe Day 2006.


Well, this bread/cake is a sweet version - but, Aparna decided that we make the lesser known savory kugelhoph. The savory Kugelhoph traditionally has diced ham or bacon added. But, we tried and kept it vegetarian.

I followed the recipe that Aparna has on her blog, except for the addition of tomatoes - the link for the same is here

Ingredients

3 to 3 1/2 cups all-purpose flour
2 tsp instant yeast
1 tsp salt (or to taste)
75gm butter, at room temperature
3/4 cup milk
2 eggs, beaten lightly
1 tsp oil
1/3 cup chopped green bell peppers
1 cup onions, finely chopped
1/2 cup diced cheddar cheese (preferably sharp)
1/3 cup coarsely chopped walnuts
1 1/2 tsp coarsely crushed black pepper
1 tsp dried thyme

Method

This can be done by hand but it will be a bit sticky to handle, so use of food processor or stand mixer is recommended. Put 3 cups of flour, yeast, and salt in the bowl of the processor. Pulse a couple of times to mix. The add the butter, a little at a time, and process till incorporated.
Add the warm milk and process till mixed. Now add the eggs and process till mixed. You will now have a soft and sticky dough. Knead some more, adding more flour, a little at a time and just enough till the dough pulls away from the sides of the bowl. Do not be tempted to add more flour than absolutely necessary.
Your dough will be very soft, elastic and just short of sticky. Transfer the dough to an oiled bowl, cover and let it rise until double in volume. This can take from 1 1/2 hours to 2 1/2 hours!
In the meanwhile, heat 1/2 a tsp oil in a pan. Add the chopped green bell pepper, the tomato and a pinch of salt and stir-fry till the raw smell disappears but the vegetables are still crisp/ crunchy. Remove and keep aside. To the same pan, add the remaining 1/2 tsp oil and sauté the onions with a pinch of salt till they turn golden brown. Remove and add to the bell peppers and keep aside.
Grease an 8” kugelhopf mould or bundt pan well especially around the centre (or whatever pan/ tin you plan to use). Place some of the chopped walnuts in the bottom of the mould. If you’re using a loaf tin or brioche moulds, then don’t do this. Instead press in the walnuts on top of the dough after the second rise, just before baking.
Once the dough has risen, deflate it. Then work the cheese, stir-fried onions, bell pepper and tomato, the remaining walnuts, black pepper and thyme into the dough. The best way to do this is to flatten the dough out and spread all this over the surface, fold the dough over and then knead it. This will ensure a more uniform incorporation of the “filling”. The dough will be a bit sticky, so use a scraper to help you with the kneading. Do not add more flour!
Roll the dough into a longish log, long enough to fit into the mould comfortably. Lift the “log” of dough and place it in the mould in a circular fashion and pinch the two ends together to close the “circle” of dough. Cover and let the dough rise for about an hour or so, until it reaches the edge/ rim of the mould.
Bake the Kugelhopf at 200C (400F) Pre-heat oven to 400 degrees for about 35 to 40 minutes until the top is golden brown and sounds hollow when it is tapped.
Unmould the Kugelhopf and let it cool on a rack. Slice and serve. This Kugelhopf should serve about 10 people and is also good for breakfast, as a snack or served with a simple soup.

Sunday, April 13, 2014

Baked Doughnuts - We Knead to Bake # 6


We had baked these doughnuts in June 2013 in the 'We Knead to Bake' group with is the brainchild of Aparna who pens at My Diverse Kitchen

I loved doughnuts a lot.... well, loved is a wrong term as I still love them. However, once I knew they were these deep fried goodies, my love became rationed. I used to savor them on a very rare occasion. When Aparna said that we were going to bake doughnuts as bread #6, I was very very happy.

Well, my doughnuts turned out a bit flat, because I rolled the dough very thin and got a very big doughnut hole in the middle too, blame it on the katora/vati that I used to get the doughnut shape. But, overall - it was fun to bake these yummy things and even a good feeling to have a guiltfree baked doughnut. However, if you personally ask me - I would always go in for the deep friend doughnut, even if it means an occasional treat for me.

This recipe was adapted from Lara Ferroni’s Doughnuts

Ingredients

For the doughnuts
1/4 cup superfine sugar
1 cup warm milk (110 F)
1 tbsp active dry yeast
1/2 tsp salt
2 tsp vanilla extract
2 1/2 to 3 1/2 cups cake flour (or all-purpose flour) divided, plus more for kneading
100gm butter, cut into 1 inch cubes

For the topping
75 to 100gm butter, melted
1 cup superfine sugar + 2 tablespoons cinnamon (more or less, depending on your taste), mixed together
OR
glazes of your choice (I used a readymade chocolate glaze)
OR
jam to fill your doughnuts

Method

Using a processor to knead helps but you can do this by hand.
Put the sugar, milk, yeast, salt and vanilla in the processor bowl and pulse to mix well. Add 2 1/2 cup cake flour OR all-purpose flour and process, adding a little more of the flour as necessary till the dough is thick and pulls away from the sides of the bowl.Now add the butter pieces one at a time and process till there no large chunks of butter are left in the bottom of the bowl. Now add a little more flour until your have a soft, pliable and elastic dough that is moist but not overly sticky.
Turn the dough out onto a floured surface and knead gently until the dough no longer sticks to your hands. Shape the dough into a ball and place in a lightly greased large mixing bowl., turning it to coat well. Cover and let it rise till double in volume. This should take about an hour.
Punch down the dough and roll out to a thickness of 1/2" (I rolled it thinner like a chapatti and hence those flat doughnuts). Cut out doughnuts using a doughnut cutter or whatever you have on hand to cut out 3” diameter with 1” diameter holes. If you’re making doughnuts to fill with jam, then do not cut out the holes. Place the doughnuts and the holes on parchment lined or lightly greased baking sheets, leaving at least 1” space between them.
Re-roll the scraps and cut out more doughnuts.
Let them rise for about 20 minutes or till almost double in size and then bake them at 200C (400F) for about 5 to 10 minutes till they’re done and golden brown. Do not over bake them.
Take them out of the oven and immediately brush them with the melted butter and then dip them into the cinnamon sugar mixture. If filling the doughnuts with jam, let them cool. Put the jam into a piping bag with a writing nozzle/ tip and press into the doughnut from the side and gently press out the jam into the doughnut till it starts oozing out. Jam doughnuts do not need too much jam to fill them. If glazing your doughnuts, let them cool completely and then dip one side of the doughnut in the glaze of your choice and let it set.
This makes about 15 doughnuts.
Related Posts Plugin for WordPress, Blogger...